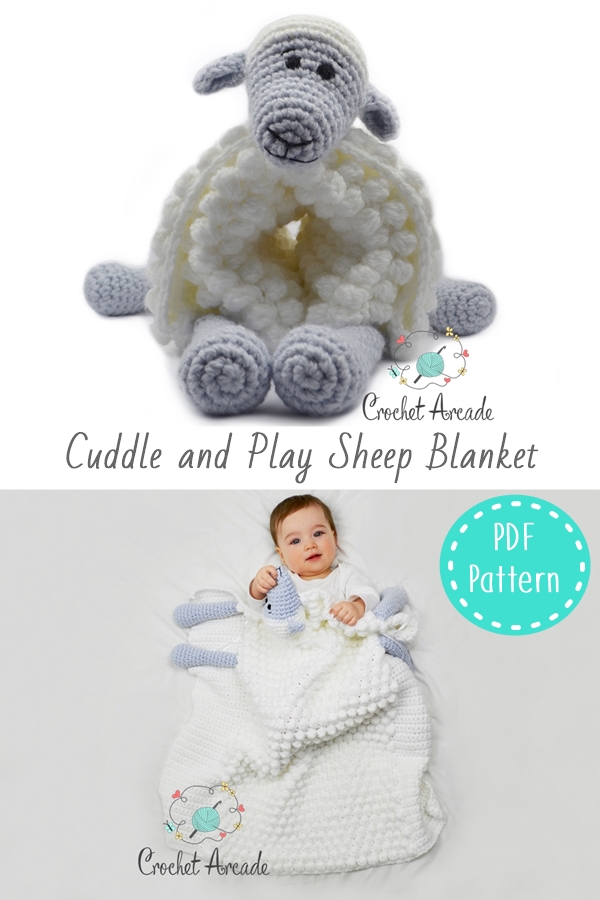
I just love the texture of the Bobble Stitch Blanket! In fact, bobble stitch has inspired me to create the crochet pattern I’m the most proud of: Cuddle and Play Sheep Crochet AmiBlanket Pattern – The Supersoft Bobble Stitch Crochet Blanket that turns into Amigurumi when folded (pattern first published 8 April 2018)! This is a very useful blanket to take on your travels and not only! Baby can Play with the blanket when covered with it while in a pram/stroller or a car seat and Cuddle up to it to fall asleep. When the blanket is not used as a cover then it can be turned into Amigurumi toy in seconds for a baby to snuggle and play with. How cool is that?
![]()
In this pattern tutorial I’ll explain how to create 3 different types of bobbles for a different texture and yarn usage. Scroll down to see Full Photo and Written Bobble Stitch Blanket Crochet Pattern Tutorial that is so detailed that I think even Crochet Beginners would easily understand it or Watch my Bobble Stitch Blanket Crochet Pattern Video Tutorial below (just click on play).
There is 3 basic sizes of bobbles:
Note: First bobble of the row is different, scroll down to the photo tutorial for the instruction.
Small Crochet Bobble – Made out of 3 unfinished Double Crochet US (Treble Crochet UK) stitches.
Instruction: [Yarn over, insert hook in a stitch, yo and pull through the st, yo and pull through first 2 loops on your hook only] x 3, yarn over and pull through all 4 loops on your hook.
Medium Crochet Bobble – Made out of 4 unfinished Double Crochet US (Treble Crochet UK) stitches.
Instruction: [Yarn over, insert hook in a stitch, yo and pull through the st, yo and pull through first 2 loops on your hook only] x 4, yarn over and pull through all 5 loops on your hook.
Large (Normal) Crochet Bobble – Made out of 5 unfinished Double Crochet US (Treble Crochet UK) stitches.
Instruction: [Yarn over, insert hook in a stitch, yo and pull through the st, yo and pull through first 2 loops on your hook only] x 5, yarn over and pull through all 6 loops on your hook.
The last one is the one that will give you the most texture and I have to admit it is the prettiest but it will eat up A LOT of yarn, so if you are making something on a budget, try using medium or even a small bobble and see if it still works for you.
For my Cuddle and Play Sheep Crochet Amigurumi Blanket I used medium bobble and it is still very bubbly and cuddly and I’ve saved some yarn too!
Look, my baby Maria loves it too 🙂
![]()
CROCHET BOBBLE STITCH BLANKET CROCHET PATTERN PHOTO & WRITTEN TUTORIAL
Crochet Beginner Tutorial
Abbreviations:
| US Abbreviation | US Term | UK Abbreviation | UK Term |
| Ch | Chain | Ch | Chain |
| Sc | Single Crochet | Dc | Double Crochet |
| Dc | Double Crochet | Tr | Treble |
| St | Stitch | St | Stitch |
| Lp | Loop | Lp | Loop |
This tutorial is in US crochet terms, please refer to the table above for terms conversion to UK terms.

Start with EVEN amount of chains. I started with 8 ch for the small tutorial sample.
Row 1) Always start with a row of Single Crochet starting from 2nd ch from hook. You should end up with uneven amount of stitches, in my case 7 sc.

Row 2) Row 2 will be a row of bobbles interchanging with single crochet stitches. This will row will start with a bobble and will end with the bobble stitch.
First Bobble Stitch of row 2 is different then the rest of the bobble stitches in the row because we start this row with 2 ch which counts as a part of the bobble and first dc (US terms) and there is no working loop. In the first bobble of the row you will always have 1 less loop to go through at the end.
Instruction for ONLY 1st bobble of the row:
Turn and make 2 ch (counts as first unfinished dc)
Step 1) yarn over (hook),

Step 2) insert the hook in the first stitch,

Step 3) yarn over hook again and pull through the stitch,

Step 4) Yarn over hook again and pull through the first 2 loops on your hook ONLY

You should now have 2 loops on your hook

From now it all depends on which size of the bobble you chose to make.
Small Bobble – Repeat steps 1 to 4 one more time to create 3 unfinished Dc stitches in total.
Medium Bobble – Repeat steps 1 to 4 two more times to create 4 unfinished Dc stitches in total.
Large Bobble – Repeat steps 1 to 4 three more times to create 5 unfinished Dc stitches in total.
Step 5) Yarn over and pull through ALL loops on your hook (Small bobble – 3 loops, medium – 4 loops and large – 5 loops

Step 6) Pull on your working yarn while holding the top of the bobble to tighten it, push it out to the back.

That’s the first bobble of row 2 completed, continue the row as follows:
[Single Crochet in the next St, bobble in the next st] repeat sequence in the bracket to the end of the row, in my case total of 3 times.
Now as I mentioned at the beginning, the first bobble of the row was different because it has 1 less loop (working loop) on the end to go through.
MID ROW/STANDARD BOOBLE INSTRUCTION:
Small Bobble – Repeat steps 1 to 4 THREE times, yarn over through FOUR loops on hook.
Medium Bobble – Repeat steps 1 to 4 FOUR times, yarn over through FIVE loops on hook.
Large Bobble – Repeat steps 1 to 4 FIVE times, yarn over through SIX loops on hook.

That’s how the completed row 2 looks like facing you when you finished:

Now flip over to the other side and that’s where the pretty side is:

Note: COLOR CHANGES – If you would like to make each row of bobbles in a different color/ stripes then change the colour by dropping old color and pulling new color instead when doing last ‘yarn over, pull through all loops on your hook. Always change the color when finishing the row of bobbles so the row of single crochets and row of bobbles above it are both in the same color.
If you want your bobble stitch crochet blanket to have straight edges and have bobbles on top of bobbles in straight line then just repeat sequence of row 1 and 2 until you achieve the required length of the blanket. If you want the bobbles to sit nicely in between each other in a diagonal line (like in my bobble stitch blanket) then continue to row 3 and 4 below.
Row 3) 1 turning ch, sc in each stitch to the end of the round.
Note: Be careful not to miss any stitches. Top of the stitches of single crochets are smaller then top of the stitches of bobbles so they can be easily missed.


Row 4) 1 turning ch, sc in first st, [bo in next st, sc in next st] to the end of the round. In my case repeat the sequence in the bracket 3 times in total.

This row will have 1 less bobble and one more sc then row 2.

Repeat the sequence of rows 1 to 4 until you achieve the required blanket length. In other words: row 5 will be the same as row 1, row 6 will be the same as row 2, row 7 will be like row 3, row 8 will be same as row 4 and so on.
That is it! I hope you enjoyed this Bobble Stitch Blanket Crochet Pattern. If you did, please remember to SHARE IT with your fellow Crocheters, using social media Sharing buttons on the end of the post.