Do you have enough of the Unicorns yet? Well some of you may have as the Unicorn took fashion by storm and you can find almost any product with a Unicorn theme. Unicorn Hats, Unicorn Bags, Unicorn Blankets, Unicorn theme clothing and even Unicorn Toilet Paper!
If you are amongst the ones who are still obsessed with those mystical creatures or you know someone special who is then you are in the right place!
Unicorns took over a crochet world too. When I was asked to create a Unicorn themed pattern for my guest post at Oombawka Design blog I first thought that this will be easy! When I started to type my ideas into Google though, it turned out that almost any imaginable Unicorn Themed Crochet Pattern was already created! Me being me, I love to be ORIGINAL so I just had to come up with something that hasn’t been created before. After hours of researching, when I was nearly giving up, I have finally got it. I’ll create a Unicorn Mobile Phone Pouch (or Unicorn Cell Phone Pouch for you guys in USA)!

I also thought that this Unicorn Theme Accessory will also match ideally to my Unicorn Mobile (or Cell) Phone Holder Crochet Pattern.

Both of those Unicorn Crochet Patterns can be an amazing and QUICK CROCHET GIFT IDEA for Unicorn Fan of any age!
If you are looking for a Unicorn Amigurumi Pattern then check out my Roundup post ‘20 Most Amazing Unicorn Amigurumi Crochet Patterns‘.
UNICORN MOBILE/CELL PHONE NECK POUCH CROCHET PATTERN

PATTERN INFORMATION
MATERIALS:
Crochet Hook: Size 4 mm
Yarn A: Baby Sparkle Super Soft Double Knitting Yarn (This was purchased in Poudstretcher UK), 100 g ~ 290m, 97% Acrilic, 3% Metallised Fibre.
MC – White with silver metallic.
Yarn Substitutes: King Cole Baby Glitz, King Cole Glitz, James C. Brett Baby Twinkle DK, James C. Brett Twinkle DK, Hayfield Bonus Glitter DK, Stylecraft Wondersoft Stardust
Yarn B: Twilleys Goldfingering, 4-Ply, 25g (0.9oz) ~ 100 m, 80% Viscose, 20% Polyester.
Color B – Silver 005
Color C – Gold 002
Yarn Substitutes: Anchor Artiste Metallic, Sheepjes Lizzy, Plymounth Yarn Gold Rush
Embroidery Thread – Grey Colour
Optional: Bag metal chain 24″ (60cm) long (I bought this one very cheap on ebay, similar on amazon here). Alternatively instead of metal chain just make a Romanian Cord using Color C. Flat back crystal rhinestones for eyes or embroider your own.
Tools: Yarn Needle, scissors, stitch marker.
ABBREVIATIONS (US TERMS):
YO- Yarn Over (hook)
St – Stitch
Sts – Stitches
Sl st – Slip Stitch Lp – Loop
Lps- Loops
Ch – Chain
Sc- Single Crochet
Hdc – Half Double Crochet
Dc- Double Crochet
Tr – Treble Crochet
sc2tog – Single crochet Two Together (single crochet decrease)
MC- Main Color
RS- Right Side
< > – Stitches in the bracket go all in one stitch
[ ] – repeat the sequence in the square brackets given amount of times indicated after the bracket.
( ) – number inside this bracket indicates the total amount of stitches in the round/row.
SPECIAL STITCHES INSTRUCTION:
sc2tog – insert hook in next st, yo and pull up a loop, insert hook in the following st, yo and pull up a loop again, yo and pull through all 3 loops on your hook.
GAUGE: 18 stitches and 17 rows to 10 cm x 10 cm (4 x 4 in) over single crochet using 4mm hook and DK size yarn.
SIZE:
POUCH – 6 in (16 cm) x 3.75 in (9.5 cm)
HEAD – 3.75 in (9.5 cm) x 3 in (8 cm)
MUZZLE – 1 in (2.5 cm) x 2 in (5 cm)
EARS – 1 in (2.5 cm) height
HORN – 1.5 in (4 cm) height
UNICORN MOBILE/CELL PHONE NECK POUCH CROCHET PATTERN

POUCH PATTERN:
Pattern notes:
• Pouch is worked as one piece from the bottom up, in a round.
• Because single crochets are worked in a round, they will naturally lean one way which will cause a slight slant. If this is an issue for you, as an alternative you can use ‘crochet knit look stitch’ otherwise called ‘waistcoat stitch’ instead which will eliminate the slant completely.
• Attach a stitch marker on the front of the last stitch. Move this marker up on the last stitch of each round.
• Work first stitch of the new round directly on top of the first stitch from previous round without joining to it first with sl st.
Using MC and 4 mm hook make 17 ch.
1) Starting from 2nd ch from hook make sc in each top loop of the chain (total 16 sc), flip the row upside down and continue making sc sts in the remaining loops (bottom loops) on the opposite side of the chain (32 sc in total).
2) Sc in each st to the end of the round (32 sc).
Repeat row 2 until your pouch has the height of your phone and then add 2 or 3 more rows depending on how deep you want your phone to sit in the pouch.
For my iPhone SE I made 26 rows in total.
Sl st to the next st to minimise ‘the step’ caused by crocheting in a round and fasten off. Weave in the ends.
This is how the pouch looks from the back. The place where we fastened off is visible but this will be hidden when we join the head to the back of the row.

HEAD
Pattern notes:
• Starting 2 ch of each round does not count as hdc.
• On the end of each round sl st to the first hdc (besides round 5).
Using MC and 4 mm hook make 7 ch.
1) 2 hdc in 3rd ch from hook, hdc in next ch, sc in next 2 ch, 3 sc in last ch. Continue making sts in the remaining lps (bottom lps) on the opposite side of the chain as follows: sc in next 2 lps, hdc in next lp, 2 hdc in last lp (13 sts).
2) 2 ch, 3 hdc in first st (the bottom of 2ch), 2 hdc in 2nd st, hdc in next st, sc in next 2 sts, 2 sc in next st, 3 sc in next st, 2 sc in next st, sc in next 2 sts, hdc in next st, 2 hdc in next st, 3 hdc in last st (23 sts).
3) 2 ch, hdc in first st (the bottom of 2ch), 2 hdc in next 4 sts, hdc in next st, sc in next 5 sts, 3 sc in next st, sc in next 5 sts, hdc in next st, 2 hdc in next 4 sts, hdc in last st (33 sts).
4) 2 ch, [hdc in next 2 sts, 2 hdc in next st] x 3, hdc in next 5 sts, [2 hdc in next st, hdc in next st] x2, 2 hdc in next st, hdc in next 5 sts, [2 hdc in next st, hdc in next 2 sts] x 3 (42 sts).
5) 2 ch, hdc in next 4 sts, 2 dc in next st, 2 ch and sl st to the next st,

sl st in the next 10 sts (mark 10th sl st with a stitch marker or a yarn, this is where we will start sewing on the muzzle later on), sl st in the next 20 sts,
sl st to the next st and make 2 ch, 2 dc in next st,

hdc in next 4 sts (44 sts – not counting chains).
On the end rather than making a sl st in the first hdc of the round, sl st to top of starting 2 ch instead. Fasten off and weave in the ends.
Tip: Use starting end to sew on the gaps around the staring chain when weaving in the ends.

JOINING THE HEAD AND POUCH TOGETHER:
To join the top of the head to the back row of the pouch:
1) Start with making a slip knot on your hook using MC.

2) Insert the hook in the top of ch-2 made on the right side of the head, facing the RS of the sts.

3) Flatten the pouch and assess which 15 stitches of the back row are centrally at the back of the pouch. Because of the slight slant, the last st where we fastened off will not be exactly at the side of the pouch (unless you used a waistcoat stitch method instead). My first st on the right side of the back happened to be 2 sts before the fasten off bump as showed on the photo below.
Insert the hook in to your first st on the back of the pouch (facing the front of the pouch), yo and pull through all the lps on your hook to join the head to the pouch with sl st.

Continue joining the head making 15 slip stitches in total (including top of the starting ch-2 from round 5 which is in the middle of the head). Mark 4th an 11th sl st straight after you make them with either stitch markers or different colored yarn to mark where to start the ears later.

Clip of the yarn and fasten off.
Tip: Rather then weaving in the ends from both sides, use them to re-inforce the sides of the joint by making overcast stitches several times, very tightly over 2 sl sts on both edges. This is where we will attach the chain strap on the end.

EARS
Pattern notes:
• Ears are made directly on top of the pouch.
• When making ears, make 1 turning ch at the end of each row.
Ear 1: Make a slip knot on your hook leaving about 8 inches long tail. This will be used to sew overcast sts around the edge of ears to make the edges neater. Start 1st ear in the 4th sl st counting from the right side (there will be a gap of 5 sts between the ears).

1) 2 sc in next 2 sts, turn (4 sc).
2) Sc in each st, turn (4 sc).
3) [sc2tog] x 2 (2 sc).
4) Sc2tog (1 sc).
Make 1 ch and fasten off. Weave in the end back and forth throughout the middle of the rows to minimise the gaps.
Use the other yarn end (long one) to make overcast sts, close together, over the edge of the ear.

Ear 2: Skip 5 sts and start making 2nd ear in the next marked st (11th sl st). Follow all of the instructions as for the first ear.
MUZZLE
Using Color B and 4mm hook make a magic ring (check out my magic ring tutorial).
1) Make 3 ch (counts as dc) and 5 dc, all in center of the magic ring and turn (6 dc).
2) Make 3 ch (or chainless dc for a better finish) and dc in the first st, make 2 dc in each of the remaining sts (12 dc).
Clip of the yarn and fasten off leaving longer end (around 10 in). Do not weave it in.
SEWING ON THE MUZZLE
With Color B make a slip knot on your hook. Join the round part of the muzzle to the bottom part of the head using sl st method. Clip of the yarn and fasten off.

Thread the long yarn end from the right side of the muzzle on the large eyed needle and sew the straight, top part of it to the head with an overcast stitch.

HORN
Pattern notes:
• Horn is made in a round.
• Attach a stitch marker on the front of the last stitch. Move this marker up on the last stitch of each round.
• Work first stitch of the new round directly on top of the first stitch from previous round without joining to it first with sl st.
Using Color C and 4mm hook make a magic ring.
1) 4 sc in the center of the magic ring (4sc).
2) Sc in each sc (4 sc).
Tighten the magic ring and weave in the ends securely to prevent the ring coming undone.
3) Repeat Round 2 (4 sc).
4) [2 sc in next st, 1 sc in next st] x2 (6 sc).
5) To 7) Sc in each sc (6 sc).
8) [sc in next 2 sts, 2 sc in next st] x2 (8 sc).
9) Sc in each sc (8 sc).
Clip of the yarn leaving a longer end needed to sew on the horn.
SEWING ON THE HORN
Thread the yarn end from the bottom of the horn on the large eyed needle and using an overcast st, start sewing on the horn to the top middle 3 sts between the ears. Then move on to sew on the remaining part of the horn over the height of the hdc below, trying to keep it as round as possible.


Clip off the yarn and fasten off. Weave in the ends.
EYES
Sew on the eyes as pictured below or whichever way you like. If you don’t feel confident enough in sewing the facial features just use glue on the flat back crystal rhinestones/gems.

HEART
I’ve added a little heart to the bottom of the pouch to make it a little bit more interesting. Star would also be a great applique to use.
To make a little heart, make a magic ring, using Color C and 4 mm hook. Make following sts in the centre of the ring: 1 ch, hdc, 2 dc, tr, 2 dc, 3 hdc, 1 ch, 3 hdc, 2 dc, tr, 2 dc, hdc, on the end sl st to the first ch, tighten the ring cut the yarn leaving a longer end and fasten off. Tie a knot with the other yarn end to secure the magic ring and use the longer end to sew on the heart in place.

To finish of the pouch attach the chain to the top edges of the pouch. If you don’t have the chain make a Romanian Chain (I used it in my Free Lavender Crochet Pattern) instead using Color C and attach it with sl st.

THE END
If you would like to say thank you for the pattern please SHARE this post on your Facebook or Pin it to your Pinterest board using buttons below the post or just hover over any photo for a ‘Save’ button to show up . Thank you
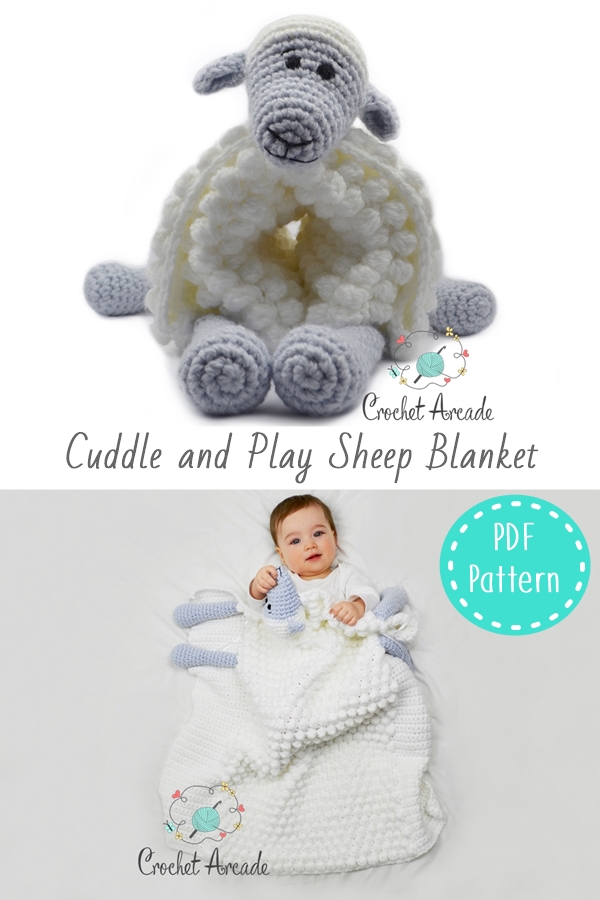
Check out my Innovative Cuddle and Play Sheep Crochet Blanket and Cover and Play Teddy Bear Crochet Blanket. Blankets that turn into Amigurumi.

![]()