Invisible finish or in other words Invisible fasten off is a crochet technique to join stitches together and fasten off the yarn usually when crocheting in round. Traditional method to end the round is to join last stitch of the round with top of first stitch using slip stitch. Then to fasten off you cut the yarn, do yarn over hook and pull through the loop on the hook all way to the end. Unfortunately this technique leaves an unsightly bump at the top of your circle and basically just looks very messy and that’s where invisible finish comes to the rescue.

INVISIBLE FINISH (FASTEN OFF) TUTORIAL
Step 1 – At your final round, cut the yarn off leaving around 4-6 inch (12-15cm) end.

Step 2 – Pull the hook up all the way to unravel the loop on your hook. Remember NOT to yarn over first like in the traditional method. Then thread the yarn end on the yarn/embroidery needle.

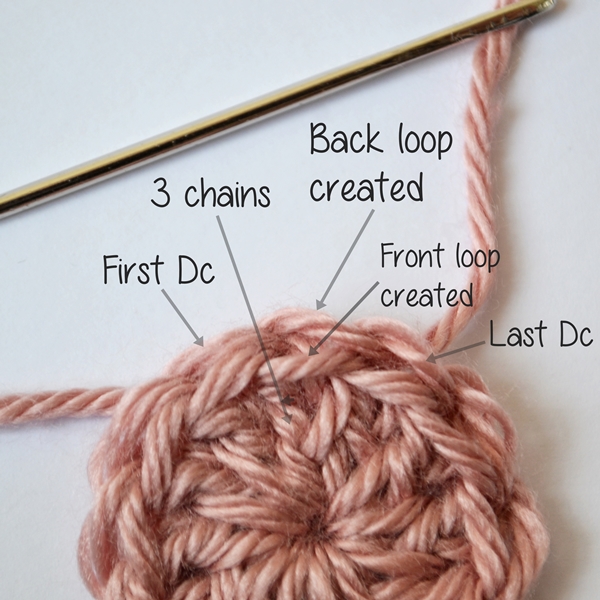
Examine the photo below before proceeding. In this scenario I’ve made 12 double crochets out of which first one is made out of 3 chains, second stitch is first ‘proper’ Double Crochet. I now will join last double crochet to first stitch by creating additional front and back loops that will look exactly like top of any other stitch (so called ‘v’). So I don’t create additional tops of the stitches (amount of top of the stitches is the same as posts of the stitches), I will make my new loops with yarn needle directly over the 3 chains as shown in next steps.

Crocheting in the Round: Mix & Match Hats (w/ Stacey Trock)
Step 3 – Insert the needle underneath the top (both loops-front and back) of first double crochet (or call it a second double crochet if you count 3 ch as first dc), skipping the 3 chains. Pull the yarn through to the back but not too tight and you’ve created front loop that is directly over the 3 chains.

Step 4 – Go back and insert the yarn needle underneath the back loop only of the last double crochet made in this round. That will create back loop directly over the 3 chains.
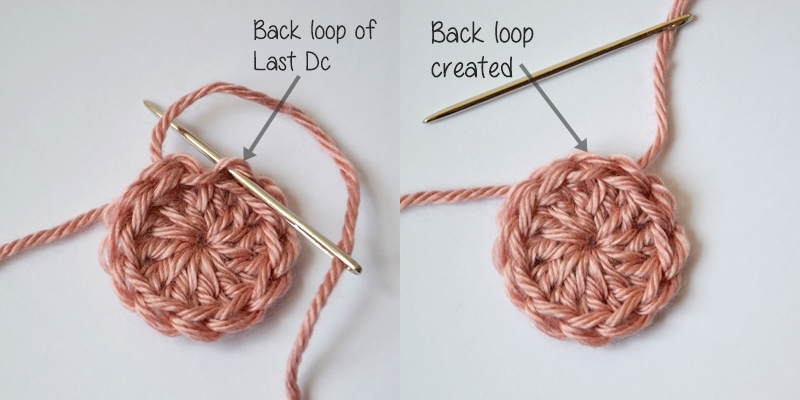
Step 5 – weave in the ends at the back as usual.
To summarize this is what we’ve created:
I hope you enjoyed this tutorial. Happy Crocheting!
Affiliate Disclosure: I am grateful to be of service and bring you content free of charge. In order to do this, please note that when you click some links on this post and purchase items, in most (not all) cases I will receive a referral commission. Your support in purchasing through these links enables me to keep designing free crochet patterns and tutorials for you to use. Thank you! ?